Http Client call
- 스프링에서 제공하는 html client로 API call module 만들기
RestTemplate
- restTemplate bean 만들기
- restTemplate은 커넥션을 만들고 응답을 받으면 끊어준다.
- 커넥션 풀을 만들 수 도 있고 커넥션에 대한 설정을 할 수 있음.
    @Bean
    public RestTemplate restTemplate(@Value("${application.rest.timeout.read}") Integer readTimeout,
                                     @Value("${application.rest.timeout.connect}") Integer connectTimeout) {
        HttpComponentsClientHttpRequestFactory factory = new HttpComponentsClientHttpRequestFactory();
        factory.setConnectTimeout(connectTimeout);
        factory.setReadTimeout(readTimeout);
        HttpClient httpClient = HttpClientBuilder.create().build();
        factory.setHttpClient(httpClient);
        return new RestTemplate(factory);
    }
HttpComponentsClientHttpRequestFactory는 아파치 httpclient의 구현체로 시스템 프로퍼티를 사용해 디폴트 httpclient 인스턴스를 만들어 준다.
connection pool
- 매 연결 시 tcp 통신을 하며 핸드쉐이크가 일어나는것을 줄이기 위해 connection pool을 만들 수 있다.
- connection pool을 사용하기 위해서는 서버 어플리테이션에서도 커넥션 수를 잡아 줘야 한다.
HttpClient httpClient = HttpClientBuilder.create()
 .setMaxConnTotal(xxx)
 .setMaxConnPerRoute(xxx)
 .build();
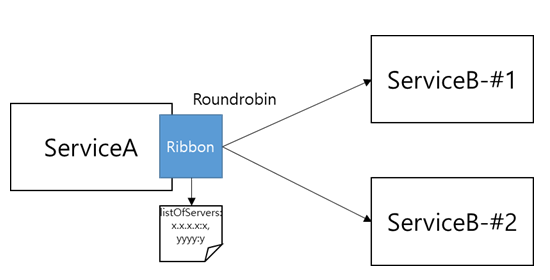
Loadbalencing

l4 스위치 같은 하드웨어적으로 로드벨런싱을 하는 것이 아닌 소프트웨어에서 수행할 수 있게 한다.
ribbon을 통해 작성된 서버리스트 끼리 로드밸런싱을 수행해 준다.
라운드 로빈 방식 사용
어노테이션 추가
    @Bean
    @LoadBalanced
    public RestTemplate restTemplate() {
        ...
        return new RestTemplate(factory);
    }
- 호출 URL 키워드로 등록
serviceA:
rebbon:
    listOfServers: localhost:8081, localhost:8082
    MaxAutoRetries : 0
    MaxAutoRetriesNextServer : 1
http://serviceA/apiAPI url 이런식으로 호출
service에서 호출
        //set header
        HttpHeaders headers = new HttpHeaders();
        headers.set("Accept", "application/json");
        headers.set("Content-Type", "application/json; charset=UTF-8");
        //api call
        ResponseEntity<String> response;
        response = _$restTemplate.exchange(url, HttpMethod.GET, new HttpEntity<String>(headers), String.class);
